Archive for the ‘preschool crafts’ Category

Making A Garden Roadway {Crafting With Little Kids}

July 26, 2012

As the parent of a four year old boy, my house has become overrun with tiny cars, anything Disney Cars related, and lots of trucks.  I find that my friends who are girl-mamas also have the assortment of wheeled vehicles.  We often turn our train table into a roadway, but being it’s summer, we are outside often and those little cars get lost in the sandbox.  Inspired by a project I saw on the Lowes’ website for building a backyard road, I thought I would give it a try.  My son was really excited about this project so I decided to and enlist his help in the whole thing.  It doesn’t look like what I originally intended, but it came out perfect for him. You can check out Lowe’s instructions for this project and read on to see how it worked out in real life for us!

Supplies:
Bricks, we used about 28 small ones and two large ones for “parking lots”
white and/or yellow paint
paint brush
rubber mulch (the recycled tire kind that is soft and squishy)
landscape adhesive and a caulk gun (optional)
toy cars and trucks

Depending on your space, this project can be as simple or as elaborate as you want. We have a play area in our yard that we have covered with rubber mulch. I used a small part of that for our road. I also decided that we would be attempting to create this project on as small of a budget as possible. I was able to use some bricks I found in our yard, along with purchasing the least expensive bricks I could find (at $.50 each) for the road. I also used acrylic paint that I already had. My son had fun helping me pick out and buy bricks. I let him decide on the layout of the road initially, then tweaked it a bit so that the road connected.

After laying out the road in the desired pattern, adjust the bricks so that they are lined up tight to each other and laying on a flat surface.  I raked the area we used first to level it a bit, since there was already mulch on the ground.  Initially I thought I would use the landscape adhesive to attach all of the bricks, but then it kept raining and the bricks were too wet to use the adhesive.  I still haven’t gone back to attach them and it hasn’t been a problem.  It may also be easier to break down the road in the future when my son is no longer interested in it. 

My son really wanted to help paint the lines on the road, as you can see in the photos.  The Martha Stewart in me was freaking out, but I kept that in my head and let him have fun with it, which he really did.  He wanted parking lots too, so he painted spaces on one big brick while I did the other.  He also wanted road signs, which is why one brick is painted red for a stop sign. 

After the paint was dry, I added two bags of rubber mulch to the area, inside and around the road.  I figured it would be a softer place to kneel or sit while playing there, as well as cover the sides of the bricks. 

This turned out to be a fun project that my son is proud of and enjoys using.  Let me know if you try it!


You can find more crafts and adventures with a preschooler on Diane’s blog, Knitting Zeal.


Making Garden Chimes {Crafting With Little Kids}

June 15, 2012

I was looking for a fun and easy craft project to make with my son that could be completed outside and with very little materials.  I had made this garden chimes project years ago with a bunch of pre-teens, but it’s simple enough to do with preschool aged children.  In the end we had a fun decoration for the yard and were able to enjoy spending time outside.

Materials:

  • Three small terracotta plant pots, all the same size or in decreasing sizes. (We used pots that were 1.5 inches high and 2.5 inches high.)
  • 36 inches of jute twine
  • small bell (optional) 
  • 2 or 3 plastic pony beads
  • washable or acrylic paints
  • paint brushes

Directions:
Cover your table with paper to protect the surface.  Give three plant pots to your child to paint.  (Note: washable paint does not turn out very bright, but is kid safe.  If you think your kids can handle regular acrylic paint, the results will be much more vibrant.  We stuck with washable paints!)

Once the pots are dry, cut a length of jute twine about 36 inches long.  A small bell can be tied to the end if desired, or just knot the end a few times around a plastic pony bead.  Then, holding the smallest pot upside down, thread the twine through the hole in the pot, then thread on another bead.  Hold up the next pot to the twine to see approximately where it would overlap the first pot slightly so that it will rattle against it and place a knot around the bead. Then thread the next pot onto the twine and repeat with the bead and knot for the final pot.  Knot the twine as close as possible to the top pot so that it stays put.  Tie a loop for hanging on the other end of the twine.

Experiment and add more pots to the chimes for a more dramatic effect or use increasingly larger pots to make a really big garden chime.  If there are several kids in a family, each one can paint one pot and then string them together to have a family-created chimes or to give as a gift.

Terracotta pots are fairly fragile, so it is recommended that kids are supervised when handling them.  Once the chimes are finished, hang them in a tree or on a porch out of reach if you are concerned that little ones might play roughly with them.  My son loved playing with my example ones, and despite being fairly rough, they did not break.  They will break easily if dropped, though.


You can find more crafts and adventures with a preschooler on Diane’s blog, Knitting Zeal.

Crafting with Little Kids: Recycled crayons

September 17, 2011

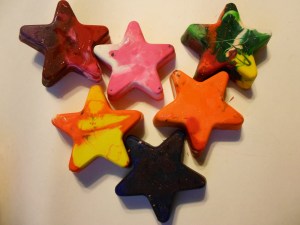
This is a great craft project to make at the beginning of a school year when new crayons are on sale. I found boxes of 24 Crayola crayons for sale at Target from $.20 to $.40 during back to school sales. Personally, I prefer Crayola brand crayons for this project because they melt nicely (no affiliation!) This is also a good way to clean out your child’s crayon box filled with broken crayons and recycle them into new shapes. When my son was turning two, I made these crayons to give out as favors for his birthday party. Now that he is almost four, he is old enough to help with most of this project.
Materials:
  • silicon cupcake molds or standard cupcake baking pan with paper liners
  • crayons….we used about two boxes of 24 each plus some broken ones from our crayon box
  • oven (a toaster oven is great for this!)
  • small sharp knife or X-acto knife
  • wood toothpick or skewer
Directions:

To make new crayons out of old ones you need not just crayons, but a shaped pan to melt them. I purchased a silicon star-shaped cupcake pan at the craft store that I only use for this project, since the crayon wax does stain the silicon. I have seen directions for this project online that used standard tin cupcake pans and paper liners, but I personally haven’t tried that method. I liked the star shaped ones as they give the new crayons five points and are chunky enough to allow even toddlers to grip them well. (An alternative method for this project would be to melt each color in a container individually and pour the melted crayon wax into a candy mold or ice cube mold to set, but to me that is not a kid-friendly craft because of the abundance of handling hot wax.)
To start, we set out the crayons we wanted to use for melting. The most time consuming part of the project seems to be removing the paper labels. Crayola uses corn starch and water as glue for their labels. It really sticks well! If you have kids with nimble fingers who like to peel off the paper, they will love this part of the project. To speed things up, I used a sharp pairing knife to carefully score the paper on the crayon and peel off the wrapper. I put all of the “naked” crayons in a container. While I was removing labels, my son broke up all of the crayons into smaller pieces and sorted the colors into the mold in the color combinations he wanted. He really enjoys sorting items, so this was a lot of fun for him. It’s important to not overfill the molds and to make sure there are no crayons sticking out the top, as they will melt and overflow into your oven. (To make rainbow crayons, mix up the colors a bit in each mold. Once melted, the adult can swirl the colors together a bit with a toothpick.) Each mold used about four crayons.
This next step is for adults only, or older kids who are allowed to use the oven. Once the molds are filled, preheat your oven or toaster oven to 250 to 275 degrees F. I used 250 degrees, but the wax will melt faster at 275. I used a piece of aluminum foil under my silicon tray in case of drips of stray wax. It took about 20 minutes for the wax to completely melt at 250 degrees F, but that can vary depending upon your oven and how long you preheated it. Be sure to set a timer at five to ten minute intervals to check on the wax. (You can use a wood toothpick or skewer to poke at the wax to see if it’s melted through.)

Once it it melted, turn off the oven and carefully remove the pan to cool. To speed up cooling, put the tray in the freezer, once it is safe enough to handle. Freezing the silicon mold for a while makes removal of the crayons really easy.
Once your new crayons are removed from the molds they are ready to be used! The rainbow combinations were the favorites here!
You can find more crafts and other adventures with a preschooler on Diane’s blog, Knitting Zeal.

Crafting with Little Kids: Musical Shakers

August 3, 2011

Making noise seems to be a popular activity for most kids! My son loves music and making instruments out of just about anything. After three years of Music Together classes, his favorite instruments that he played with during class were the “kitchen instruments” which were metal cans and bowls, spoons, and bottles filled with beans for shaking. I thought it would be fun to make our own shaker bottles at home and was pleasantly surprised how much he enjoyed this activity. Filling the bottles with a funnel proved to be an activity that kept him occupied for a good 15 minutes (crafts here often take under ten minutes!)

This is a really easy craft project that can be made with household items you already have on hand. I reused two plastic bottles from cream and half and half from our local dairy where I buy milk, since they sell cute pint and half pint sizes that make perfect sized bottles for little hands. Empty plastic bottles from drinks, spices, or even plastic eggs work too. The important factor with the container is that it is plastic and the lid can be glued on securely to prevent a mess or choking hazard for babies in the home.
Materials:
  • small plastic bottles with screw-on lids
  • dried beans/peas/rice
  • stickers for embellishment
  • funnel
  • small bowls or cups to hold beans
  • spoon
  • glue, such as gorilla glue
Directions:
If reusing plastic bottles, be sure they are thoroughly clean and dried before using for this craft. Explain to your child that they will be making musical shakers with bottles filled with beans. Set up the craft area with a cookie sheet or tray to catch stray beans. Set out small bowls or cups with the beans/peas/rice. We used a combination of dried black and white beans along with some brown rice. Each made a different sound!
Insert the funnel into one open bottle and let your child use the spoon or their hands to fill the bottle with beans. This was so much fun that my son kept asking for more beans to add to his bottle. Be sure to stop the bottle filling at or before the half way point so that there will be enough room for ample shaking. Screw on the lid. (Later when your child is not around, glue the lid on with gorilla glue or something similar to prevent a mess.)
Bottles can be embellished with stickers. If you trust your child to use Sharpie markers safely, they could be used as well. Regular markers tend to not work well on plastic bottles.
Turn on some music and get shaking!
You can find more crafts and other adventures with a preschooler on Diane’s blog Knitting Zeal.

Crafting with Little Kids: Father’s Day craft ideas

June 15, 2011

Making a useful craft for Father’s Day can be somewhat of a challenge with little kids. Sure, dad would appreciate anything his little one made, but making a gift that won’t just collect dust can be more rewarding. For this Father’s Day, my son and I made an apron for dad to be used for grilling. (Isn’t it funny how the guy who never cooks indoors LOVES to cook outdoors with fire?) This project could easily be done using a plain white or other light colored tee shirt or even a piece of canvas that can be framed.

For our apron project, we used a plain white apron purchased at the craft store, fabric paints and a fabric marker. Other supplies needed: sponge brushes and paper towels for clean up. In the craft store you’ll find an asile full of fabric safe paints and embellishments, along with various tees, shopping bags, aprons, and other items that can be used with fabric. While it was just one child making this gift, if you have several children, it is helpful to have each child pick one color of paint to use, so that their handprints or designs are easier to identify on the final product.


We chose to do hand and footprints using the fabric paint on our apron. A painted design by the kids could just as easily be done, although it is a bit more difficult to paint with brushes on some fabrics. Fabric markers may work much easier for little kids if they would rather color a design or scribble a picture instead.

We did this project in the bathroom, next to the bathtub, for quick clean up! (It was rainy outside.) Fabric paint dries fast! I used a sponge brush to coat the bottom of my son’s feet, one at a time, and helped him with placement of his foot. After the first foot, I wrapped his painted foot in a paper towel, then worked with the second foot, then stuck him in the tub to clean off the paint. Hands were a bit easier, but again, little kids will need guidance so that they don’t end up accidently painting the walls!

After my son’s painted prints dried, I used the fabric marker to embellish the apron with a message to Daddy and a funny quote by Homer Simpson, since my husband is a big Simpson’s fan. This was a fun project that I know my husband will love using.

Other Father’s Day craft ideas:

Create a puzzle from a favorite photo: print a photo of daddy and child, either at home or at a photo center. Blow it up to 8 x 10 if possible. Adhere the photo to a piece of cardboard or foamcore with spray adhesive. On the back of the cardboard/foamcore, Mom or other adult can draw a puzzle design for little kids and use an exacto knife to cut out the pieces. (Older kids could design their own puzzle, but an adult probably should cut it out!) Kids can decorate a manilla envelope or small box to hold the puzzle.

Create a photo book for dad using one of the online companies that feature them. We did this last year and it was a hit! (Snapfish.com, Shutterfly.com and Picaboo.com all offer various deals on photobooks.) Use a collection of favorite photos of dad and the kids and include funny captions.

Bake Dad’s favorite dessert and present it on Father’s Day. Cookies or brownies in a box decorated by the kids makes it even more special. Or use a plain cookie tin and have the kids use paint markers to decorate it and personalize it for dad.

Kids Crafts is a website full of other fun crafting ideas!

You can follow Diane’s adventures with her preschooler on her blog Knitting Zeal!

Crafting with Little Kids: "Marbled" paper eggs

April 15, 2011

Here is a painting technique with golf balls that can be used for all sorts of themed projects. For this project we used egg shapes cut out of construction paper to decorate for Easter and spring, but plain paper, or any shape will work as well. My son first painted with golf balls at preschool and enjoyed it so much we decided to try it at home. We are not golfers, so I purchased plastic golf balls at a sporting goods store, but all you really need is two or three golf balls, so if you know a golfer, borrow some! Supplies:

  • 3 golf balls
  • washable paint (we used crayola kid paint)
  • paint brushes
  • paper eggs: use this template or draw your own on construction paper
  • 3 or four sheets of construction paper in spring colors for the eggs
  • scissors
  • small box or lid from a copy paper box (shoebox would work too)

Directions:

  1. Using a template of an egg, trace it several times onto a sheet of construction paper. I held three different colors of paper together and cut the egg shapes out so I only had to trace on one sheet.
  2. Place a paper egg shape, or more if they fit, into the box. Have your child dab some small blobs of paint onto each paper egg in random spots. Two or three dots is good to start. (We found that too much paint was a mess, but too little didn’t work either. Experiment to see what works best for you. Squeezeable paint tubes probably work great for this, but we didn’t have that on hand.)
  3. Add two or three golf balls to the box and show your child how to tilt the box in different directions to make the balls roll around. As the roll around they will pick up some of the paint and create a marble or textured effect on the paper. Roll them around until your child is satisfied with how the paint looks. We added different colors of paint to see how they combined. The more the balls roll around the more marbled the paint will be.
  4. Let painted eggs dry and decorate with them. We plan to decorate a bulletin board with them, but they would also make cute cards to give to grandparents or friends.

Note: The golf balls should wash up clean and can be saved for future use or returned to your golfer if they were borrowed. I saved the box we used so that we can re-use it for the next time we use this painting technique.

Happy Spring!

You can find more kids’ craft ideas and preschool adventures on Diane’s blog Knitting Zeal!